My First Foray into Turtle Blocks
Whew boy, this will be either be a ridiculously long post or I’ll split it up into different posts because I did a lot (or at least it felt like I did!) and I took plenty of screenshots. Whether or not I’ll be kind to my readers by not making them go through scrolling hell to read of my Turtle Blocks exploits really depends on how much energy I have left in me.
EDIT AS OF 9/28 AT 9 PM: I am sorry my loyal readers, my energy is failing thereby forcing you to endure the perpetual scrolling.
During class last week, I had a lot of fun playing around with Turtle Blocks and discovering what I could do. Believe it or not, I even enjoyed troubleshooting why something wasn’t working the way I wanted it to and/or thought it would. The detail-oriented aspect of it reminded me of making Macros in Excel—in both you have to be careful about not only what you do but also the order in which you do it. All of the skills I learned in this first session allowed me to go forth and create my masterpiece! [1] Below are two snapshots, the first is depicting what I figured out how to do during that first attempt and the second shows how I accomplished that:
The picture should show four turtles in various spots on the board having just created a small shape. The orange turtle farthest on the left has created a square where I set the color for each side. The next turtle, a dark green one in the center top of the board has made two sides of a circle and then decided to say “the heck with this, I’m doing on my own thing,” as it draws a new line at an 330° angle. The bright green turtle to the right is creating an arc of 90° with a radius of 100° four times and filling that in with bright yellow. This ends up making a white square in the middle of the circle. Lastly, we have the dark red fellow who also makes a square, but each side is set to a random color. In the photo, unfortunately, three sides are red.
I am not going to transcribe the order and exact bricks I used, but if anyone ever needs me to, I will; please just let me know!
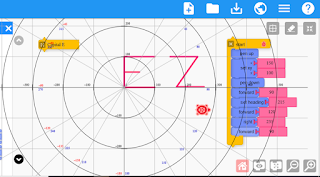
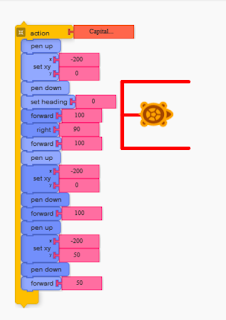
When it came to our first assignment in Turtle Blocks, I went with Dr. Ardito’s suggestion that we try writing our names. I decided to write in all caps to make it a little easier on myself. At the end of class I had already started writing the “E” and the first problem I had was that after I had made the back of the “E” and the topmost horizontal line, I couldn’t figure out how to get the turtle back down without the turtle making a line I did not want to. What I mean is that even though I had the turtle start at a new location for the lowest horizontal line I would get a line going diagonally as the turtle moved from one spot to another. This is what it looked like:
When I asked for help, Dr. Ardito asked the ever-important question, “How would you do that if you were writing in with a pencil and paper?” This led me to the discovery of the “pen up” and “pen down” functions. Once I had this magical brick at my disposal, creating the rest of the “E” was easy-peazy. [2]
Emboldened by my success I moved on to the “Z,” but alas I became Icarus and flew too close to the sun (or I was Odysseus and my hubris got in my way, depending on which tale you prefer). Dr. Ardito had also helped me discover the powerful “set heading” brick which allowed you to easily change the angle that the turtle faced which was much needed with the diagonal body of the “Z.” My downfall came when I was almost done with the letter; the only thing left to fix was the angle my turtle faced before creating the top horizontal line. Despite the finish line being so close I felt that the “Z” didn’t look right. To my dismay, I realized it looked strange because my “Z” was backwards!
Even though I had to re-do the letter, I was not starting from scratch because the bricks I was using were correct, I just had the direction and some of the placement wrong.
The “Z” was complete, but
for some reason, I still thought it looked a bit off. First, I tried changing
how long the horizontal lines were. I went from going forward 100 to going
forward 90, and while it looked better, I still wasn’t satisfied. I then
remembered that when I draw my z’s in real life I sometimes add in a little
horizontal line in the middle of the body. Ah, I thought, the “Z” is missing
the little line, and surprisingly, once that was added I declared the “Z”
finished.
The above picture shows the move from 100 to 90.
The above picture shows the addition of the little line in the middle.
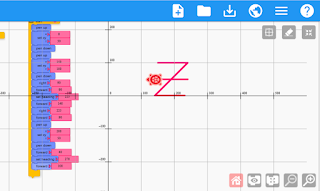
Well, the design of the “Z” was finished, but my exacting standards didn’t let me stop there. I had discovered that in order to write the “Z” properly as I currently had it, the “E” had to be written first. [3] This was frustrating because even though I could add in the action “Capital E” to the top of the “Z” I didn’t want to have to write an “E” every time there was a “Z.” Given that my first name has one of each letter, you may ask, did this limitation really matter? No, it did not, but I felt that if someone wanted to use my “Z” they should be able to without the hinderance of an unwanted “E.” [4]During my first session I was looking at the various menus and discovered that the “Flow” section had an “If. . .then” brick which I thought could help me solve the “Z” conundrum. Getting the “If. . .then” brick to work was very difficult for me because only certain types of bricks can go in the “If” section of the brick. I wanted the brick to (essentially) say “If the turtle is at (0,0) then move it to (50, 0)” which is where the turtle ends up when the letter “E” is complete. I got it to do that eventually, but that didn’t solve the problem. I soon realized this was because once the turtle completes the “E,” it not only ends at the point (50,0), it also has a different heading than what it started with. From there, obtaining “Z’s” independence from “E” was relatively smooth sailing.
The above picture shows one of my many mistakes when I was trying the "If. . .then" brick.
The above picture shows the final version of my "Z" using the "If. . .then" brick.
Creating the “R” and “A” felt much simpler after I went through the “Z” Debacle (should it be officially called the Debacle or the Conundrum? Vote in the comments if you have a strong opinion haha). Since I had already figured out that how to create an arc I was able to make a rounded “R” and the other two lines were created using similar procedures as the ones I used for the “Z” and “E.” Most of the time I spent creating the “R” was fiddling with the angles and how to make the rounded section of the “R” meet the vertical back without it looking like a strange small circle. [5]The time it took me to create the “A” was also taken up primarily by making sure the headings were the right angle. Thus, my full name was written!
The above picture shows the final version of my "R."
The above picture shows the final version of my "A."
At some point after I finished the “Z” but before I finished my “A” I realized that my poor “E” could only be created if the turtle was set at (0,0) and heading 0 (although I didn’t realize that was heading 0 until I was making the Octagon). This would not do for the same reasons I had to let “Z” be its own letter—if someone wanted an “E” they shouldn’t have to have the turtle already in a specific position. I honestly don’t recall how exactly I fixed this because it went through another transformation when I once more slightly changed all of the letters. My name was written, but the board still felt too empty and I wanted to add some artistic flair (because why not). I decided to add a border of the circles with the white squares in the center—or as Dr. Ardito called them, the coasters—that I figured out how to make in my first session. I created a line of overlapping coasters to the left of my name. This was nice, but I wanted a full border and my name was too much to the right for that to be easily feasible (and besides, centering it would be prettier I told myself). So, in the name of the aesthetic I changed the position of all the letters so that the “E” was to the left of the y axis, the "Z" centered on the y axis and both the “R” and “A” were to the right. I eventually got it so that all letters were not only in the right place, but they could also all be created no matter where, or in what direction, your turtle faced because they would orient themselves once they were in the right place.
Above is a picture of what my first name looked like before I moved the letters.
Above is a picture of what my first name looked like after I moved the letters.
Above is a picture of the final "E" in its new position. [6]>
Creating the overlapping coasters took some fiddling because I had to figure out how to best tell the turtle to always add 50 to the y value (or the x value depending if I wanted the circles to go horizontally or vertically). I ended up doing this by creating the first circle and then following it by another set of circles that would base its y value on the previous circle. From there I just changed how many times I had it repeat and where the first circle started based on how much white space I wanted between the circles and my letters. At some point during this process I decided that I wanted the colors of the coasters to be random and the letters to be one color because at first, they were both random and that was too chaotic. Below you can see two pictures of the brick order I used to make the circles, it slightly changes depending on where I want the border but this is the basic format. It's very long so I put the first half on the right and the second on the left.
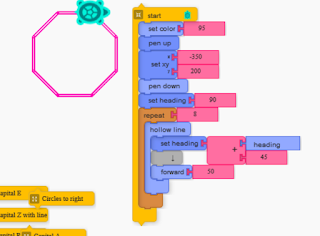
Lastly, I wanted to create a more geometric shape because they look very cool. By this point I think I was reaching my limit of how much Turtle Block-ing I could do in one sitting. I was getting frustrated more easily when I couldn’t find the right angle easily—at all stages of my project it took a lot of trial and error before I realized what angle was the right one. I thought I was making a hexagon, but I ended up making an octagon. Below is a picture of the bricks and the hexagon.
The bricks were too long, however, so I figured out that all the angles were 15° apart and set the angles to repeat until it made the octagon. I realize you can't properly see that the lines are hollow in either picture, but they are.
I then added octagons to the left, right, and bottom of my circle border. I did this by setting the starting point of the octagon and then adding the octagon shape action brick. I also made the octagon have hollow lines because it looked neat. Finally, I had my name, my circle border, and my octagons, what else could a person like me ask for? Nothing, thereby making my masterpiece complete!
Thank you so much for reading all of that mumbo-jumbo I call writing. I know it was a lot and I appreciate your dedication anonymous reader (who is probably my professor).
Notes
[1] This is the customary disclaimer that a) what qualifies as a masterpiece is subjective at best and b) I’m joking—although my mom does say that there’s always a little bit of truth said in jest. . .
[2] I realize I never specified this, but after I created any of the letters and shapes I would make them into action bricks that were labelled according to the shape it made and its placement. For instance, I had “Capital E” “Capital Z” etc, and eventually “Circles on the left,” and “Octagon on the right.” What this meant is that at the end, my set of bricks for the whole picture would be relatively short because it was only composed of the action bricks.
[3] When I was writing the “Z” I had trouble getting the turtle’s heading correctly because, even with the circle map made visible, I always got the angle too large or small. To fix this, I often had the partially constructed “Z” end on an angle so I could see where the turtle was going to go next, but in order to do that I had to write the “E” first. If I did not write an “E” first, this would happen:
It’s a nifty triangle, but not what I wanted.
[4] But, you may also rightfully ask, was anyone ever going to use my “Z” action brick? Most likely not, given that I haven’t published this project. Did that matter to Ezra of the past? No, no it did not because I apparently enjoy giving myself extra work.
[5] In case you were wondering, I did this by making the arc repeat 3 times and then adding in a straight line from the end of that last arc to the start of the vertical line.
[6] Why did I use the "If. . .then" for the "Z" and not the "E?" What a great question that I don't have a good answer to! Basically, I eventually realized that even though the "If. . .then" brick worked, there were easier ways to get the job done. That discovery was prompted by the fact that I more deeply understood why the "E" (and any letter/shape) was only working under certain parameters, namely that I had to tell the turtle specifically where to start and what direction to face.
P.S. I write my posts in Word because it has greater control over some of the text's features (e.g. creating the little numbers that I used for the notes). Once I paste the text into Blogger, I go back and add in the pictures. This makes it easy to forget where (or what) exactly I need to post a picture. If I left off any pictures that I indicate should be there, please let me know.
P.P.S. If you want to access my project, click here!


Comments
Post a Comment